The Basics of Planetary Imaging
When you observe a planet through a telescope you will notice that atmospheric conditions have a huge effect on the view. Sometimes the planet snaps briefly into sharp focus, but most of the time it shimmers and wobbles — an effect known as seeing, caused by turbulence in the Earth's atmosphere. In the days of film cameras this made planetary imaging extremely difficult.
The advent of digital cameras transformed the situation and led to the development of an approach called Lucky Imaging. Because planets are bright, it is possible to capture thousands of short-exposure frames in just a few minutes. Specialist software then analyses the video, selects the sharpest frames — those captured during the steadiest moments of seeing — and stacks them together to reduce noise and reveal fine detail. A final stage of advanced sharpening brings out the subtle surface features that make planetary imaging so rewarding.
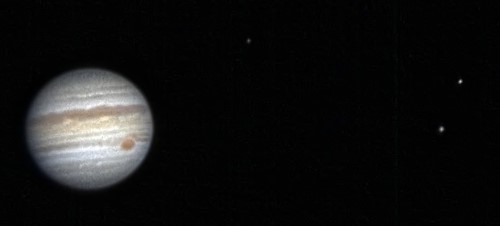
This image of Jupiter, showing three of its moons — Callisto, Ganymede and Io — is a good example of what can be achieved with relatively modest equipment. More examples of planetary imaging can be found on our Exploring the Planets page.
Getting Started
The most affordable entry point into planetary imaging is a dedicated planetary camera — compact, high frame rate cameras designed specifically for this type of work. Models from ZWO, ToupTek and similar manufacturers are available at very reasonable prices and represent a significant step up from a modified webcam. These cameras are typically paired with a long focal length telescope — a larger aperture reflector or a catadioptric such as a Maksutov or SCT works particularly well. A Barlow lens is commonly used to increase the effective focal length, allowing a larger image scale that reveals finer planetary detail on the camera sensor.
A tracking mount makes planetary imaging considerably easier, keeping the planet centred in the frame throughout the capture session. It is not strictly essential for very short sessions, but at the high magnifications typically used for planetary work even modest drift becomes noticeable quickly, and tracking will noticeably improve your results.
Going further
Like every aspect of astrophotography, planetary imaging has a habit of becoming addictive — and you may soon find yourself planning each apparition of the planets and chasing better results than the year before. Typical upgrades include dedicated colour or mono planetary cameras, narrowband filters for solar imaging, and an Atmospheric Dispersion Corrector (ADC) — a clever optical device that corrects the colour fringing caused by atmospheric refraction when planets are low in the sky, and which can make a remarkable difference to image quality.
The videos below were captured through a relatively modest Skywatcher 150PL telescope fitted with a x3 Barlow lens, an atmospheric dispersion corrector and a ZWO ASI120MC camera using SharpCap software. The first clip shows a typical night of poor seeing — the second, taken just two nights later, shows what becomes possible when the atmosphere settles down. The Jupiter image above is the result of stacking and processing frames from that second session.
If you would like to explore planetary imaging further, or get hands-on advice from experienced imagers, why not join our Astrophotography Special Interest Group? We would love to help you get started.